
Profile and Security
View or manage account information, binding details, notification and behavior preferences, security settings, 2FA management, Passkey management, login session management, and other personal settings.
- After logging in, click the "Profile" button in the left navigation bar to access the profile page
/profile. Here you can view or manage account information, account bindings, notification and behavior preferences, interface language, personal sidebar, check-in, 2FA, Passkey, access tokens, and login sessions.
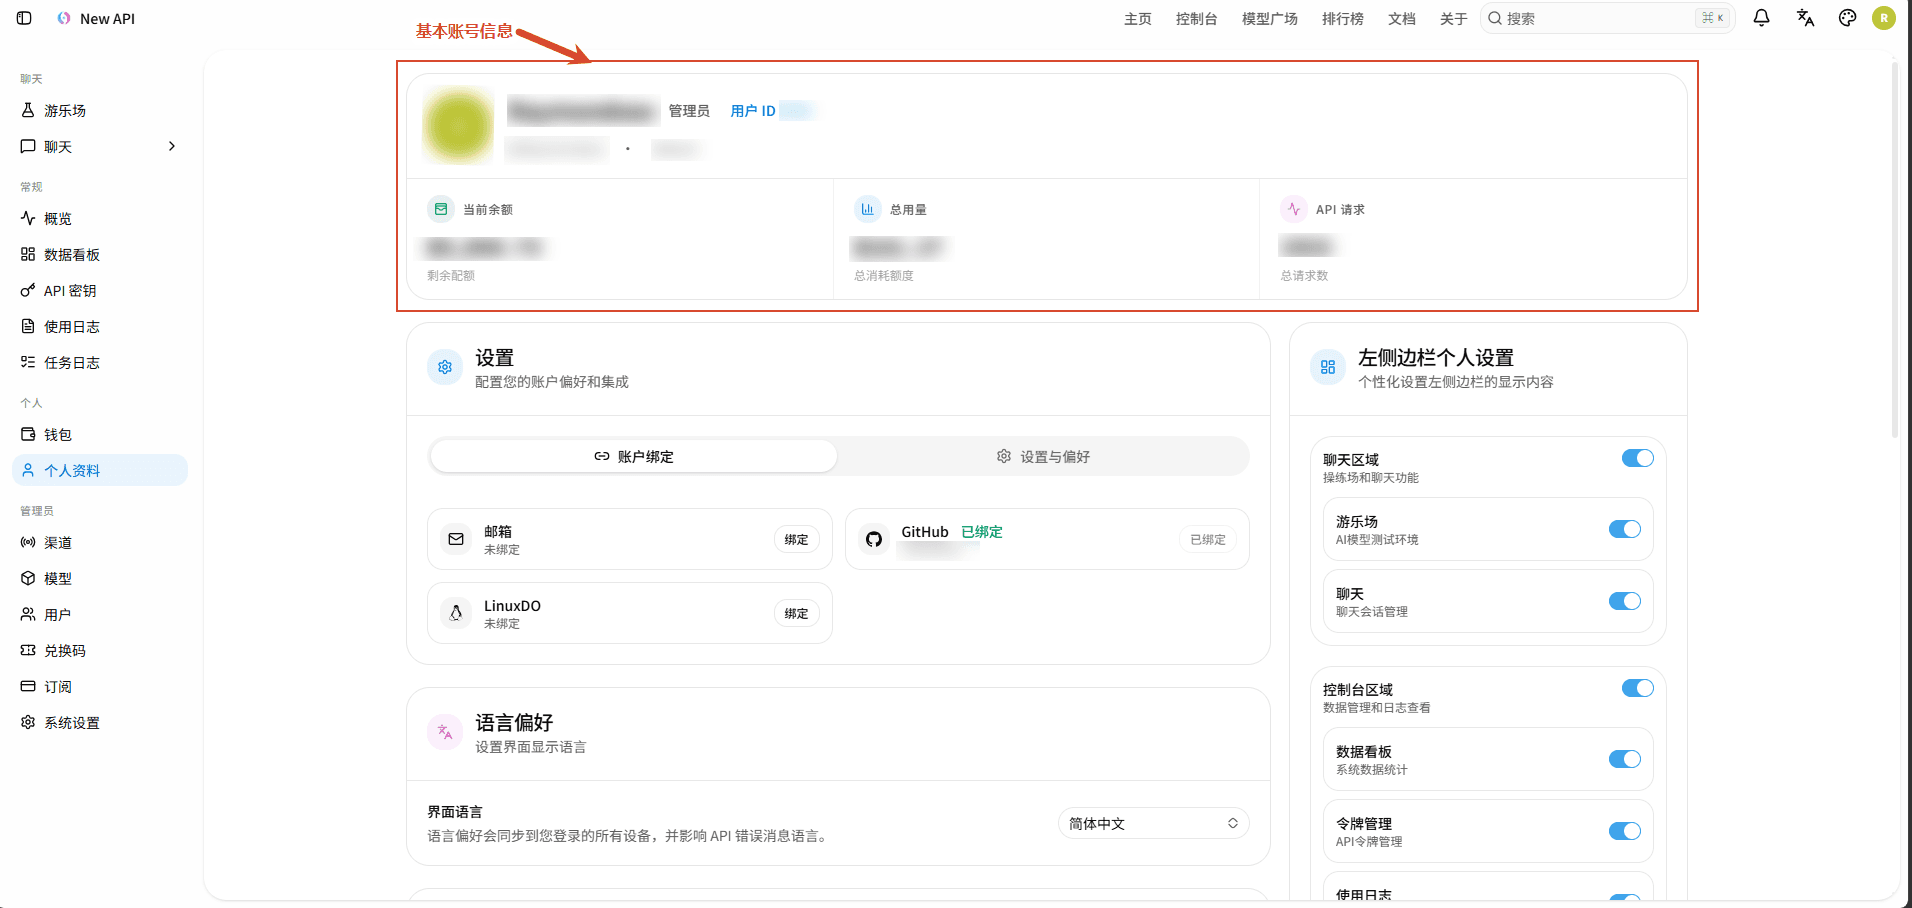
View Account Information
View account information, including name, user ID, remaining balance, total quota consumed, number of API requests, and other details.
Manage Account Binding Information
Manage account binding information, including email and third-party OAuth accounts.
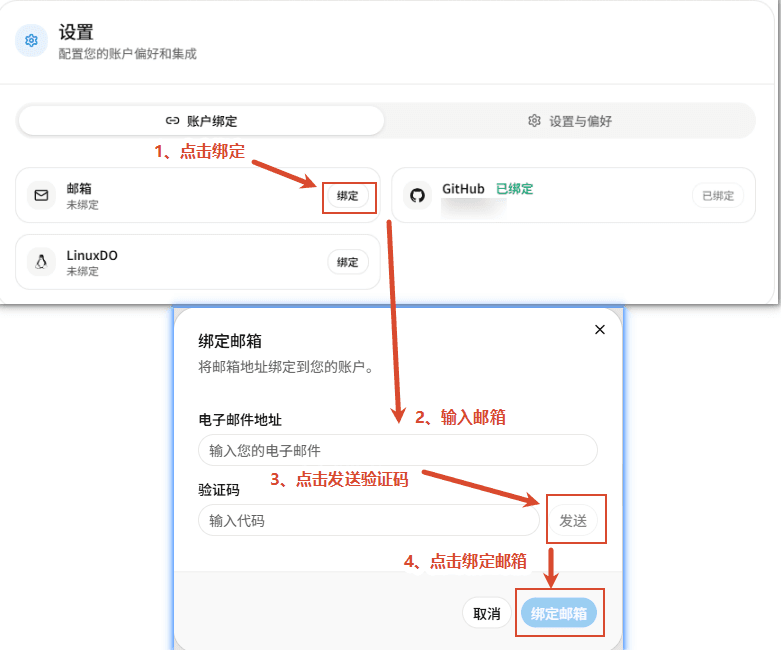
- Bind Email
- In the settings area, find "Account Binding" → "Email" → click "Bind".
- Enter the email address you want to bind.
- Click "Send" to get the verification code.
- Enter the verification code and click "Bind Email".
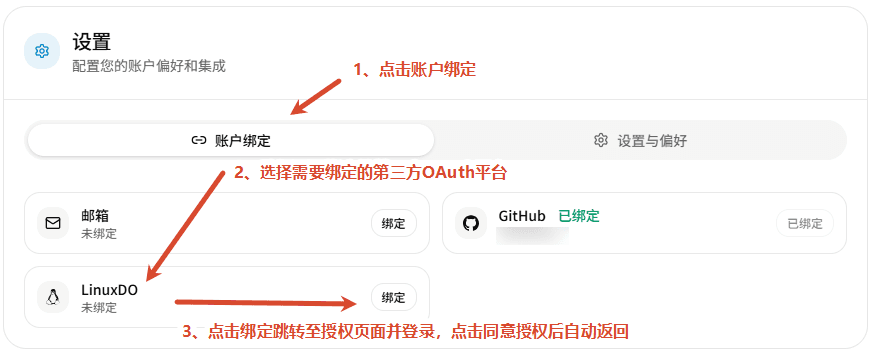
- Bind Third-party OAuth Account
- In the settings area, find "Account Binding" → "Third-party OAuth Accounts".
- Click the "Bind" button corresponding to the third-party OAuth platform you want to bind.
- The page will redirect to the platform's authorization page; log in and click "Authorize".
- After authorization is complete, it will automatically redirect back, and the binding status will change to "Bound".
Set Notification and Behavior Preferences
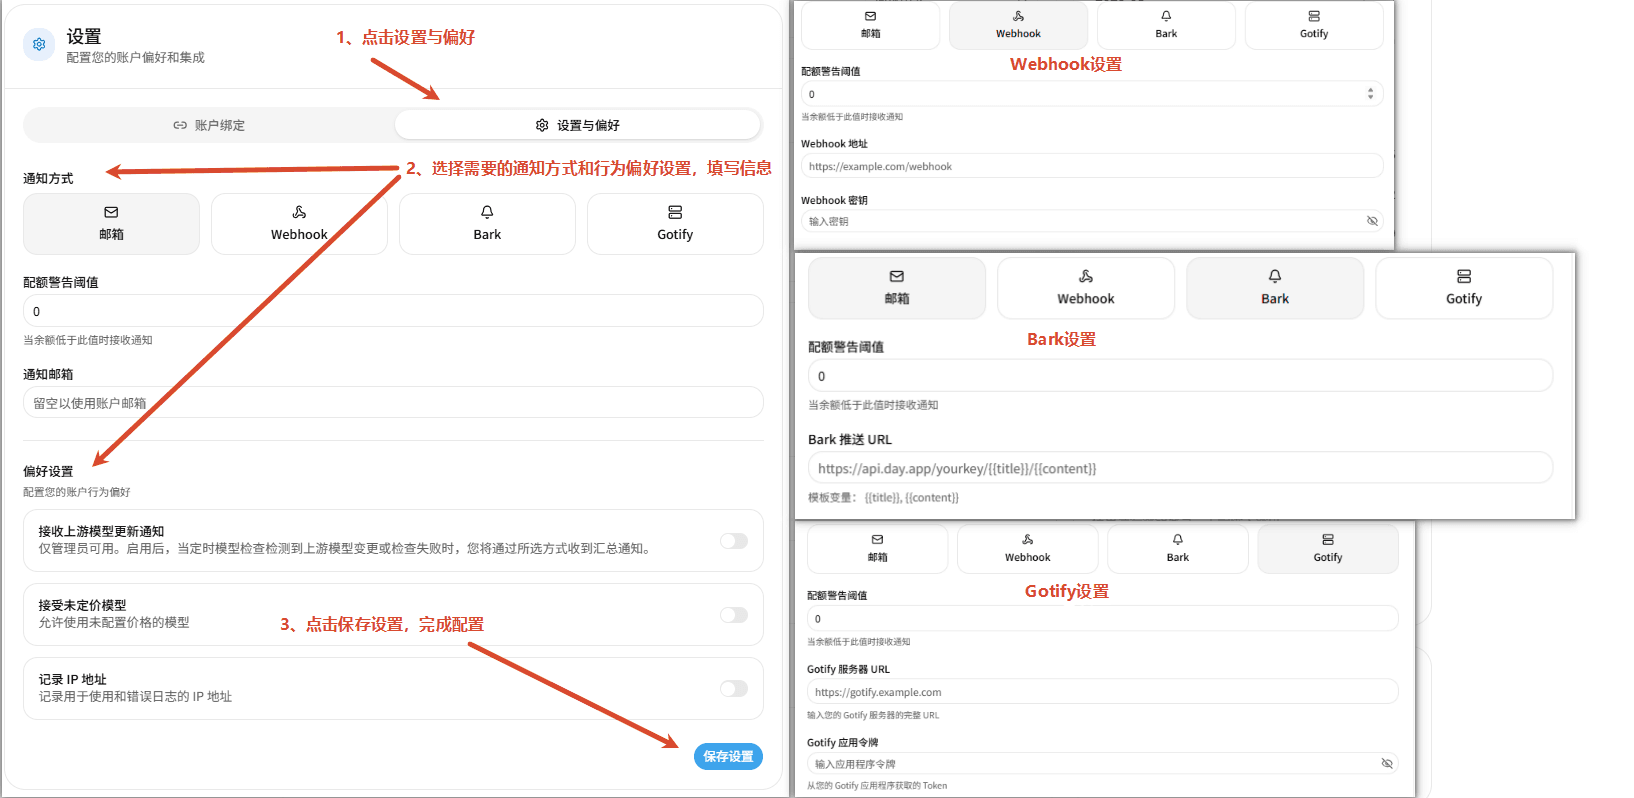
This page is used to configure account notification methods and system usage preferences.
- Notification Settings
- Notification Method: Supports selecting Email, Webhook, Bark, or Gotify to receive system notifications.
- Balance Warning Threshold: Set the balance alert amount; when the account balance falls below this value, a notification will be sent.
- Notification Email: Specify the email address to receive notifications; if left blank, the account's bound email will be used by default.
- Enter the corresponding information, and after completing the configuration, click "Save Settings" for the changes to take effect.
- Behavior Preference Settings
- Receive Upstream Model Update Notifications: When enabled, if scheduled model checks detect changes in upstream models or check failures, a summary notification will be sent via the selected notification method; this feature is only available to administrators.
- Accept Unpriced Models: When enabled, allows the use of models for which prices have not yet been configured. (Not recommended)
- Record IP Addresses: When enabled, records the IP addresses of users calling models and when requests encounter errors.
- Enter the corresponding information, and after completing the configuration, click "Save Settings" for the changes to take effect.
Enabling "Accept Unpriced Models" may lead to unexpectedly high consumption. It is recommended to keep the default setting of "Accept Unpriced Models" disabled.
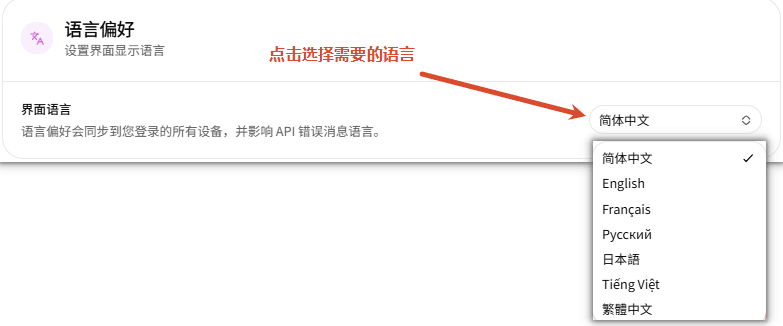
Set Interface Language Preference
You can set your interface language preference, which will be synchronized across all devices logged in with this account and will affect the API error message language.
Personal Left Sidebar Settings for Personalized Display
- This page is used to customize the functional modules displayed in the left sidebar. Users can enable or hide corresponding entries based on their personal usage habits.
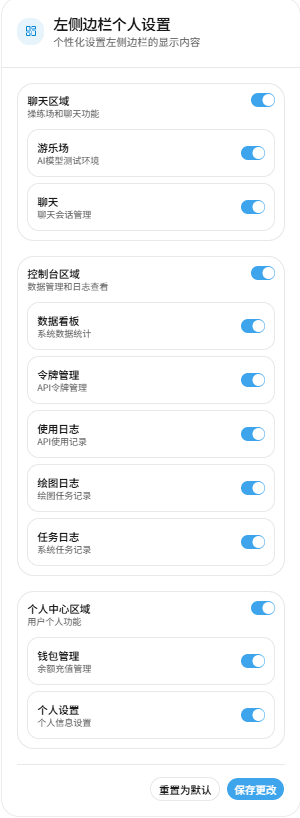
This only changes the personal navigation display and does not grant new permissions or deactivate corresponding interfaces.
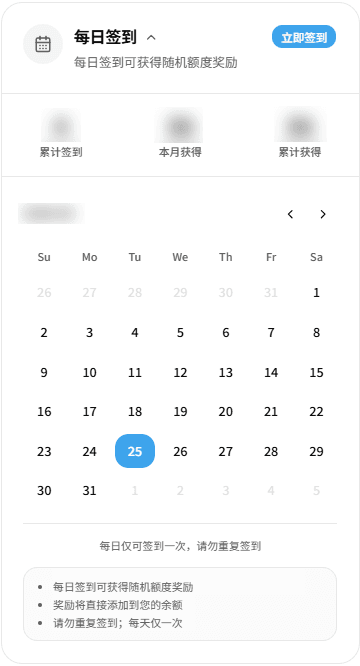
Daily Check-in
- Used to complete daily check-ins and view check-in records and rewards.
- Click "Check in now" to receive the day's random quota reward. (The random quota range is set by the platform system administrator) View settings documentation →
- The page displays cumulative check-in days, quota obtained this month, and cumulative quota obtained.
- You can only check in once per day. Rewards will be issued to your account balance, and there may be a slight delay in crediting.
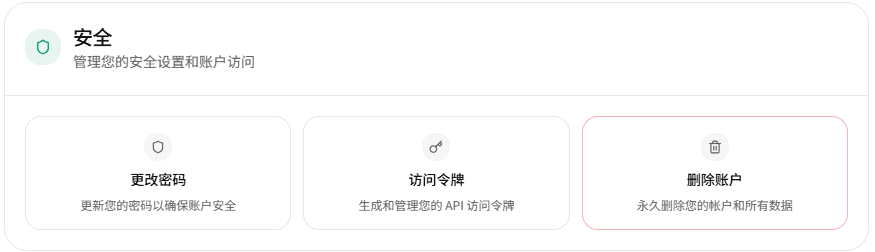
Security Settings
- This page is used to manage account security configurations and account access permissions.
- Change Password: Used to update the account login password to enhance account security.
- Access Tokens: Used to generate and manage API access tokens, supporting external applications or services to access relevant interfaces via tokens.
- Delete Account: Used to permanently delete the current account and all its associated data. This operation is irreversible and should be carefully confirmed before execution.
- If you suspect an API access token has been compromised, you can reset it:
- On the profile page, find the "Security Settings" area.
- Click "Access Tokens" → "Regenerate".
- After confirming the operation, the system will generate a new API access token.
- The old API access token will become invalid immediately, and all services using the old API access token will need to be reconfigured with a new one.
- Access tokens are used for account management interfaces and are different from API keys used for calling models; they should not be entered into third-party AI clients.
- After resetting an API access token, all existing API access tokens will become invalid, and new API access tokens will need to be recreated.
Enable or Disable Two-Factor Authentication (2FA)
- This page is used to enable or disable Two-Factor Authentication (2FA) for your account, adding an extra layer of security beyond your password.
- Enable Two-Factor Authentication: On the profile page, click the "Enable" button next to "Two-Factor Authentication".
- Scan QR Code: Use an authenticator app such as Google Authenticator or Microsoft Authenticator to scan the QR code on the page, or manually enter the key to bind.
- Save Backup Codes: Save the system-generated backup codes. Each code can typically be used only once to recover account access if the authenticator is unavailable.
- Enter Verification Code: Open your authenticator app and enter the currently generated 6-digit verification code.
- Complete Enablement: Click the "Enable 2FA" button. Once verified, the Two-Factor Authentication setup will be complete.
- Regenerate Backup Codes or Disable 2FA: Click the "Regenerate Backup Codes" button or the "Disable 2FA" button and follow the prompts to complete the corresponding action.
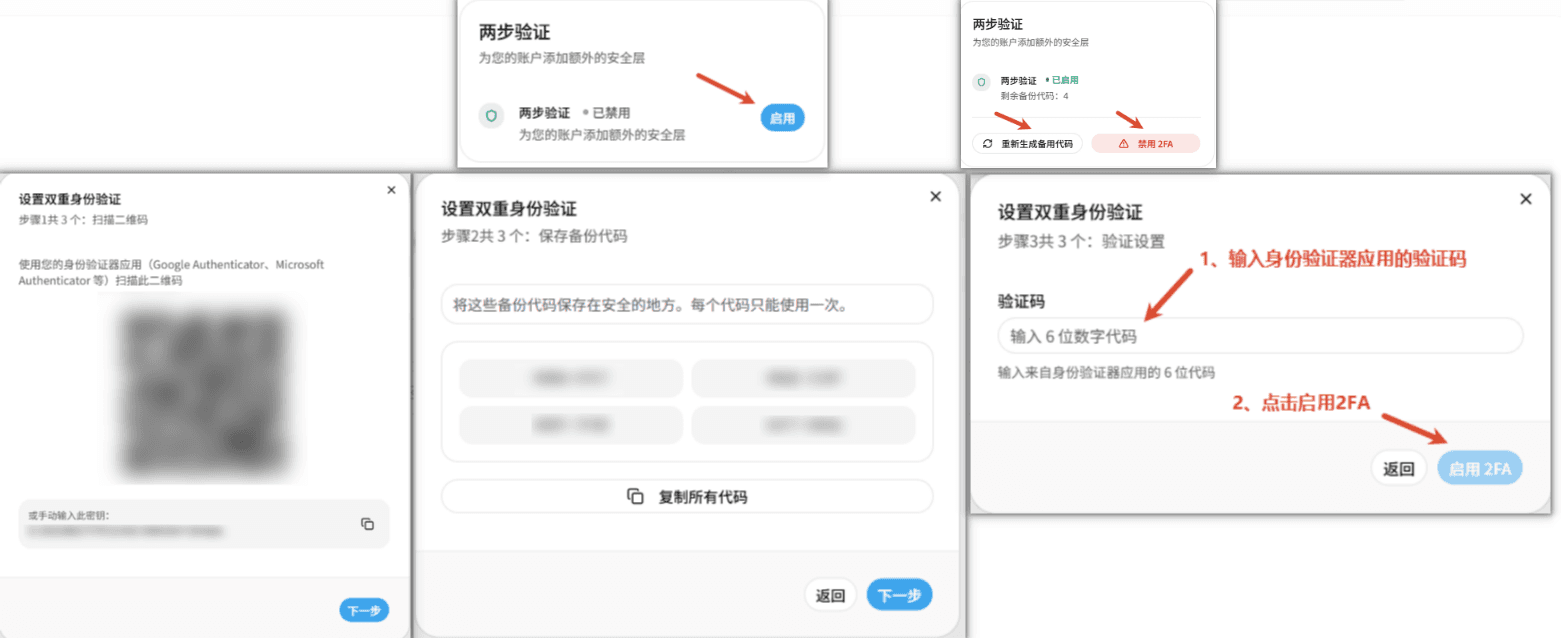
Backup codes are displayed only once and cannot be viewed again after closing the pop-up. If backup codes are lost and the authenticator cannot be used, you need to contact an administrator for a reset.
Enable or Disable Passkey Passwordless Login
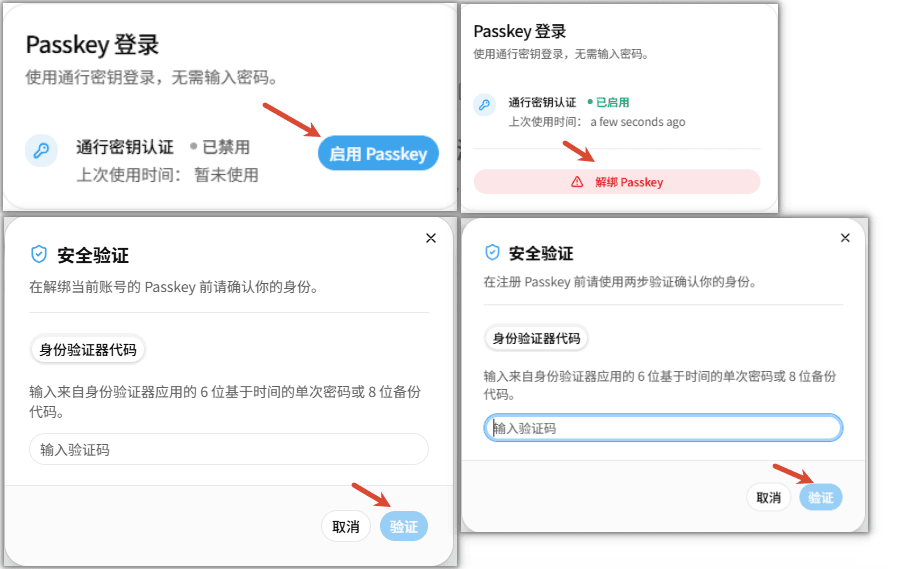
- You can enable or disable the Passkey login feature for this account. Once enabled, you can log in using your device's biometric, screen lock, or security key, without needing to enter a password.
- Enable Passkey: In the "Passkey Login" area, click "Enable Passkey".
- Complete Security Verification: As prompted, enter the 6-digit dynamic verification code generated by your authenticator app, or enter the 8-digit backup code and click "Verify".
- Register Passkey: The browser will display a system verification prompt. Follow the instructions to complete Passkey registration using your device's fingerprint, facial recognition, PIN, or other system verification methods.
- View Status: After successful registration, the page will display "Passkey Authentication · Enabled" and record the last used time.
- Unbind Passkey: To disable this feature, click "Unbind Passkey". After completing identity verification, the Passkey login for the current account will be removed.
Login Session Management
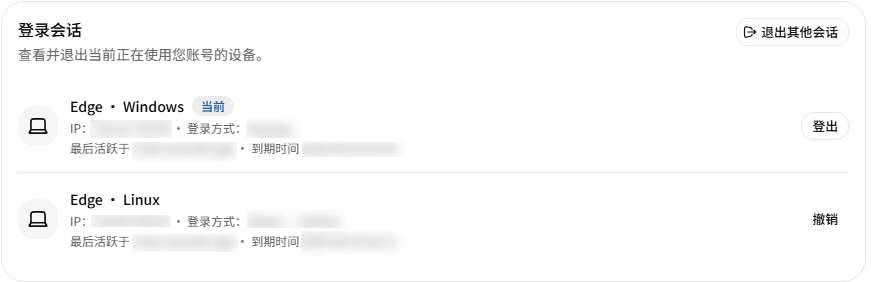
- Used to view and manage login sessions for the current account across different devices and browsers, helping users promptly detect and remove abnormal login states.
- View Session Information: View logged-in devices, operating systems, browsers, IP addresses, login methods, last active time, and session expiration time.
- Log Out of Specific Session: Click "Log Out" or "Revoke" on the right side of the corresponding login session to log that device out of the current account.
- Log Out of Other Sessions: Click "Log Out of Other Sessions" in the top right corner of the page to log out of all other logged-in devices except the current one.
- Manage Login Status: If you discover unfamiliar devices or unusual login records, immediately revoke the corresponding session and promptly change your account password.
How is this guide?
Last updated on
Registration and Login
Supports account registration, forgotten password reset, account password login, and one-click login with Passkey and various third-party OAuth providers.
API Keys
API keys are credentials for calling New API. Create and manage each key by setting quotas, models, groups, and source restrictions.